

HubSpot's Conditional Property Logic feature allows users to set rules for enumeration properties. This ensures that only relevant fields are displayed, depending on the value of another property, streamlining data collection and user experience. This post unveils how to optimize your HubSpot experience with conditional logic for enumeration properties.
Understanding Conditional Properties
HubSpot's Conditional Property Logic is a powerful tool for data quality and user experience. This feature, available for Professional and Enterprise subscriptions across Marketing, Sales, Services, Operations, and CMS hubs, allows admins to control which properties appear and their required status based on another property's value.
HubSpot provides pre-defined properties for various object types, and you can even create custom ones to capture unique data specific to your organization. This streamlines the user experience and ensures cleaner, more accurate data collection. For HubSpot users, utilizing conditional logic in enumeration properties unlocks significant benefits:
- Supercharged Personalization: Craft highly targeted marketing campaigns tailored to your contacts' needs and interests, boosting customer experience and engagement.
- Effortless Segmentation: Automate contact categorization and segmentation based on interactions, behaviors, and attributes, saving time and ensuring clean, organized data.
- Deeper Customer Insights: Gain valuable insights into your contacts' preferences and behaviors, allowing you to make data-driven marketing decisions.
Understanding enumeration properties and conditional property logic enables you to leverage HubSpot's power to customize your experience and optimize your marketing and sales efforts. It's essential to grasp how these features work and how to make the most of them to improve your marketing strategies.
Creating Conditional Property Logic: Step-by-Step
Now that you understand the power of conditional properties, let's dive into how to create them in HubSpot!
Accessing Property Settings:
- Head to your HubSpot settings by clicking the gear icon in the top right corner.
- In the left-hand sidebar menu, navigate to the Properties section.
- Within the "Properties" section, you'll find a dropdown menu labeled "Select an object." Click on this dropdown and choose the specific object type (e.g., Contacts, Companies, Deals) where you want to create your new property.
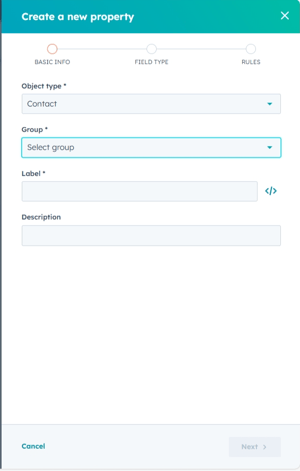
- Basic Information: Choose the object type (e.g., Contacts, Companies) where the property will be stored. Assign a unique label and optional description for the property.
- Field Type: Select the appropriate field type for your property (e.g., text, number, or dropdown menu). Depending on the chosen type, additional steps may appear (e.g., specifying the number format for the "Number" field).
- Options (if applicable): For properties like dropdown menus, define the options users can select. You can manage these options in bulk (hide, merge, delete), reorder them, or load multiple options simultaneously.
- Property Rules: Determine how the property will be used in forms, pop-ups, and bots. You can also set additional rules, such as requiring unique values for the property or making it searchable (Enterprise accounts only).
- Validation (optional): Define validation rules to ensure users enter data in the desired format.
- Create: Once all settings are configured, click "Create" to finalize your new property in HubSpot.
Editing Existing Conditional Property Logic in HubSpot
HubSpot makes editing an existing conditional property logic a breeze:
- 1. Navigate to your HubSpot settings by clicking the gear icon in the top navigation bar.
- 2. In the left sidebar, locate and select "Properties."
- 3. Choose the object type (e.g., Contacts, Companies) where your desired property resides from the "Select an object" dropdown.
- 4. The dropdown menus in the upper left corner allow you to filter properties by group, field type, or owner. Search for specific properties by name in the upper right search bar.
- 5. Click any column header to sort your properties by those criteria (e.g., label, field type).
- 6. Hover over the property you want to edit in the table and click "Edit."
Note: Certain properties cannot be edited, such as default system properties or those actively used in records, lists, or workflows.
Making Changes:
- The right panel allows you to modify various aspects of the property:
- Basic Info: Update the property's label and description (object type and internal name are locked).
- Field Type: Change the property's data format (e.g., text to number).
- Rules: Modify how the property is used in forms, pop-ups, and bots. (Professional and Enterprise plans only) Conditional options allow you to set up conditional logic for dropdown menus.
Saving Your Changes: Once you've finished editing, click "Save" at the bottom of the panel to finalize your updates.
Putting It into Practice: Using Conditional Properties for Country & State
Let's say you have a form collecting user information, including a "Country" property and a "State" property. The State property might contain a huge list of all US states and Canadian provinces. Wouldn't it be frustrating for users to sift through massive options regardless of their chosen country?
Here's where conditional properties come in! They allow you to dynamically control the options displayed in the state property based on the user's selection of the country property. For example, if a user selects "United States" from the Country property, the State property would only display US states, eliminating irrelevant Canadian provinces. This simplifies user data entry and minimizes errors by offering a more targeted list of options, translating to cleaner, more accurate data collection.
Here's how conditional properties can simplify things:
- Navigate to the "State" property settings and select "Conditional Options."
- In the "When controlling property equals" dropdown, search for "Canada" and choose it.
- Click "Only these options" and select all the Canadian provinces from the list. This ensures only relevant options appear when "Canada" is chosen in the Country property.
- Repeat steps 2 and 3 for "United States," selecting all US states.

Now, users only see the relevant state options based on their chosen country, preventing unnecessary scrolling and improving data accuracy!
But wait, there's more! Conditional properties can be used for far more than just countries and states. Imagine dynamically adjusting "Lead Source Detail" options based on the selected "Lead Source" field. The possibilities are endless!
Considerations and Best Practices for Conditional Properties in HubSpot
While conditional properties offer a powerful tool for customizing workflows, some key considerations ensure their effectiveness. Remember, they only work for enumeration property types (dropdown menus, single checkboxes, multiple checkboxes, and radio buttons) and can only control one dependent property at a time. Complex scenarios require using workflows with conditional branching.
To optimize your use of conditional properties, keep things simple and easy to understand for yourself and others who need to maintain the logic. One of the most common mistakes is setting up overly complex conditional logic, leading to over-segmentation and a fragmented view of contacts. Additionally, approach conditional logic strategically, regularly review and refine your rules, and monitor segmentation effectiveness to ensure alignment with marketing goals. Finally, consider taking it a step further by exploring dynamic content based on enumeration properties for even more personalized and relevant marketing communications.
Boost Efficiency & User Experience: Leverage Conditional Properties in HubSpot
HubSpot workflows offer a robust platform for automating marketing processes and nurturing leads through personalized interactions. Combining conditional logic with enumeration properties allows you to develop dynamic, targeted workflows that adjust based on your contacts' behaviors and attributes.
If you want to unlock the full potential of conditional properties in HubSpot but need more time or in-house expertise, look no further! Our team of HubSpot experts at SR Professional Marketing is here to help! Contact us today for a free consultation, and let's discuss how we can help you leverage the power of conditional properties to achieve your marketing and sales goals!